

 |
|
| Introduction to 3D |
|
|
|
|
|
Safe Area and Bleed
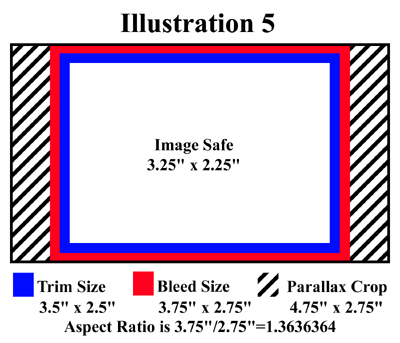
The first step is to establish some terminology related to the individual images in the sequence and the final lenticular image. Typically, a size for the final image will be know and is often referred to as the trim size. Within the trim size is an area known as the image safe area which is usually defined as an area that is 1/8" or .125" smaller on all sides than the trim size . The image safe serves as a guide to ensure that the subjects, text and/or logos of the image are not on the edge of the image after it has been cut to size. Usually a border, known as the bleed , is added to the trim size which together is called the bleed size . The width of the bleed is usually 1/8" or .125" and its purpose is to allow for slight errors that may occur when the printed image is cut to the trim size . Using a bleed and image safe area will ensure a professional appearance to the final printed and trimmed image. Another important term is aspect ratio which is the width divided by the height. The aspect ratio is useful for ensuring that the proportions of your final image are maintained through out the creative process, since most of the time you will not be working with your image at the trim size. The parallax crop is the portion of individual images that is removed from the sides of each image of the perspective sequence while setting the aim point or "stereo window". 
Copyright (C) 1999-2010 Digillax Systems. All rights reserved. | ||


 |
Last update Friday, November 26, 2010 05:20:35 AM